 By Claire Whitaker
Updated November 2026
A loyaska lift-top coffee table gives you a surface that rises to dining or work height, with storage hidden underneath. This guide walks you through checking the fit, measuring your room, setting up the mechanism and styling the table so it looks right every day. By the end, you should know whether this type of table suits your living room and how to use it safely.
What a Lift-Top Coffee Table Does Differently
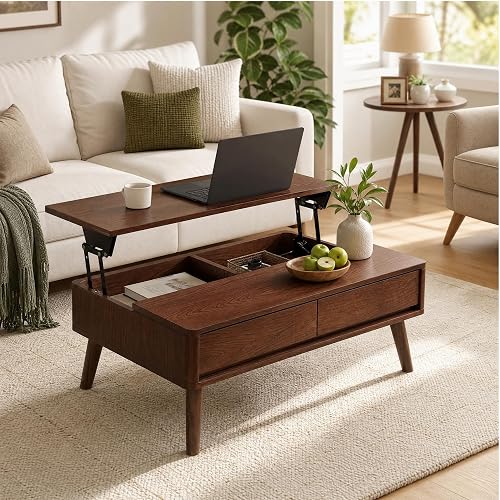
A lift-top coffee table has a hinged or mechanical top that raises vertically or pivots up and forward, usually to a height between about 28 and 30 inches. The lowered position works like a standard coffee table, while the raised position suits eating, laptop work or card games on the sofa. Most designs also include an interior cavity for remotes, blankets or chargers.
Shopping for one? See our guide: 9 Best Lift Top Coffee Tables (2026): Top Picks for Every Budget.
The loyaska lift top coffee table style follows this same basic logic, so the advice below applies to any lift-top model. Always check the specific dimensions and weight limits in the manufacturer’s manual, since lift mechanisms differ between brands.
Step 1: Measure Your Space Before You Shop or Move the Table
Start with the room, not the table. A lift-top table needs clearance for the top to open, and that clearance is often larger than people expect.
- Measure the length of your sofa and the distance from the sofa front to where the table will sit. A common guideline is 14 to 18 inches between the sofa edge and the table edge for comfortable walking room.
- Measure the full open height of the lifted top, not just the table height. Note whether the top lifts straight up or swings forward, since a forward swing needs floor space in front of the table.
- Check the path from the door to the living room. Lift-top tables often ship flat-packed, but assembled units can be heavy and deep.
- Mark the planned footprint on the floor with painter’s tape to see how it feels in the room before committing.
Quick Sizing Reference
| Room Factor | Suggested Guideline | Why It Matters |
|---|---|---|
| Gap from sofa to table | 14 to 18 inches | Allows walking and seated legroom |
| Table height (lowered) | Roughly level with sofa seat cushion or slightly below | Keeps sightlines and reach comfortable |
| Clearance for lifted top | Check manual; allow extra depth if it swings forward | Prevents bumping into the sofa or walls |
| Table length vs. sofa | About two-thirds of sofa length is a common proportion | Keeps the arrangement balanced |
Step 2: Check the Lift Mechanism and Weight Limits
Before you assemble or use the table, read the weight rating for the top and the lift arms. Manufacturers typically state these limits, and exceeding them can strain hinges or cause the top to drop unexpectedly. Keep heavy items like large books or ceramics in the storage cavity rather than stacking them on the raised top.
If the top feels stiff or uneven when lifting, stop and recheck the hardware. A pinched cable, a loose hinge screw or a misaligned arm can make the mechanism bind. If you are unsure how to fix it, consult the manufacturer or a qualified furniture repair professional rather than forcing the top.
Step 3: Assemble the Table Correctly
Assembly errors cause most lift-top problems. Work slowly and keep the hardware sorted.
Tools and Supplies You Will Need
- The Allen keys or screwdriver supplied with the table
- A soft blanket or moving pad to protect the surface while you work
- A second person to hold the top while attaching it
- Painter’s tape and a marker for labeling parts
- A level for checking the finished table on the floor
Assembly Sub-Steps
- Lay out all parts and match them against the parts list. Confirm the count of screws and bolts before starting.
- Build the base frame first, leaving bolts slightly loose so you can align everything.
- Attach the lift arms or hinges to the frame according to the diagram. Mirror-image parts are common, so double-check orientation.
- Mount the top with a helper. Tighten bolts gradually and in a cross pattern.
- Test the lift slowly through its full range. Listen for grinding and watch for uneven movement.
- Check that the table sits level on the floor. Adjust leveling feet if your model includes them.
Step 4: Set Up the Storage Interior
The storage cavity is one of the main reasons people buy a lift-top table, so organize it deliberately. Keep frequently used items near the opening and store bulky or rarely used things at the back. Lining the bottom with a thin felt or cork sheet protects the finish and keeps items from sliding during lifts. Avoid storing anything that gives off heat or moisture, such as electronics that run warm for long periods or damp towels.
Step 5: Style the Table in Both Positions
A lift-top table has two working surfaces, so style for both. In the lowered position, use a small tray, a bowl and one or two books. Keep decor low so the table does not feel crowded when the sofa is in use. When raised, clear the surface quickly by moving items into the storage cavity or onto a side table.
For small living rooms, pick a finish that matches your sofa legs or wall color so the table reads as part of the room rather than an extra object. If you are comparing other options, Lift-Top Coffee Tables: A Guide to Styles and Uses explains how different styles work in tight spaces, and Ashley Lift-Top Coffee Table: How to Choose, Measure and Style One covers styling ideas that carry over to other brands. For a look at similar mechanisms, Torlanta Lift-top Coffee Table: Sizing, Setup and Styling Guide and Rolanstar Lift Top Coffee Table: How to Choose, Assemble and Use One (2026) offer useful comparisons.
Common Mistakes to Avoid
- Buying before measuring the lifted-top clearance, which leads to bumping the sofa or walls.
- Overloading the raised top with heavy objects.
- Forcing the lift when parts bind instead of rechecking alignment.
- Placing the table too close to a radiator, heating vent or direct sunlight, which can dry or warp some finishes.
- Skipping felt pads or protective layers, which leads to scratches on both the top and the interior.
- Ignoring child safety. Keep little hands away from the pinch points near the hinges and arms.
Tips for Long-Term Use
- Lift and lower the top gently instead of letting it drop.
- Wipe spills promptly and avoid harsh cleaners on the finish.
- Tighten hardware every few months, since vibration can loosen bolts.
- Keep the manual with the table so you have the weight limits and parts list handy.
FAQ
Is a loyaska lift top coffee table the same as other lift-top tables?
Yes, in basic function. It lifts to a higher working height and offers interior storage. Check the specific dimensions and weight ratings in its manual, since these vary by model.
How high does a lift-top coffee table go?
Many lift-top tables raise to roughly dining or desk height, around 28 to 30 inches. Confirm the exact raised height in the product specifications.
Do I need two people to assemble it?
Most people find a helper useful for mounting the top. Solo assembly is possible but harder to align.
Can I put a laptop on the raised top?
Yes, a laptop is usually fine on a sturdy top, but keep the load within the manufacturer’s limit and avoid placing heavy items on the edges.
How do I clean the top?
Wipe with a soft, slightly damp cloth and dry immediately. Use only cleaners the manufacturer approves for the surface finish.
What if the top does not lift smoothly?
Stop lifting, check for pinched cables, loose bolts or misaligned arms, and tighten or realign as the manual describes. If the problem continues, contact the manufacturer or a furniture repair professional.
Is a lift-top table safe around children?
It can be, with precautions. Keep fingers clear of hinge and arm pinch points, avoid letting children climb on the table, and lower the top when not in use.
Conclusion
A loyaska lift-top coffee table works well when you measure the room, check the lift clearance and assemble the mechanism carefully. Set up the storage interior with care and style both the lowered and raised positions. Follow the manufacturer’s weight limits and safety guidance, and the table should serve as both a daily coffee table and a flexible work or dining surface.
Ready to choose one?
About Claire Whitaker
Claire Whitaker is part of our editorial team and reviews and edits our living-room tables guides, checking product details against manufacturer specifications and owner feedback.